• ABOUT
  • COLLABORATE
  • CONTACT

Life is Beautiful

Motherhood, Sewing, Family

  • SEW
  • HOME
  • PARTY
  • TRAVEL
  • SHARING MY HEART
  • SHOP

DIY: Tiffany Blue Dress.

April 17, 2012~ SEWING

When I got invited to Breakfast at Tiffany’s, my first thought was, “What am I going to wear?” I contemplated for a little bit and collaborated with one of my sponsors to have a dress shipped to me. Unfortunately, the dress came the day of the event, after the event had already ended.  Talk about perfect timing, right? 🙂 So the night before the event, I was stressing out but then remembered this really pretty aqua blue fabric I saw at JoAnn’s a week earlier.  So I went and bought the fabric, and after I put my two girls to sleep, I sewed like a mad woman.  How late did I stay up making the dress?  5 a.m.  Yep, 5 a.m people.  I wasn’t taking this whole event seriously or anything. 😉  So after 2 hours of sleep, I attended the long-awaited Breakfast at Tiffany’s.
Was it worth it?  Yes!

The picture below shows more the true color of the dress, a bright pastel aqua blue.
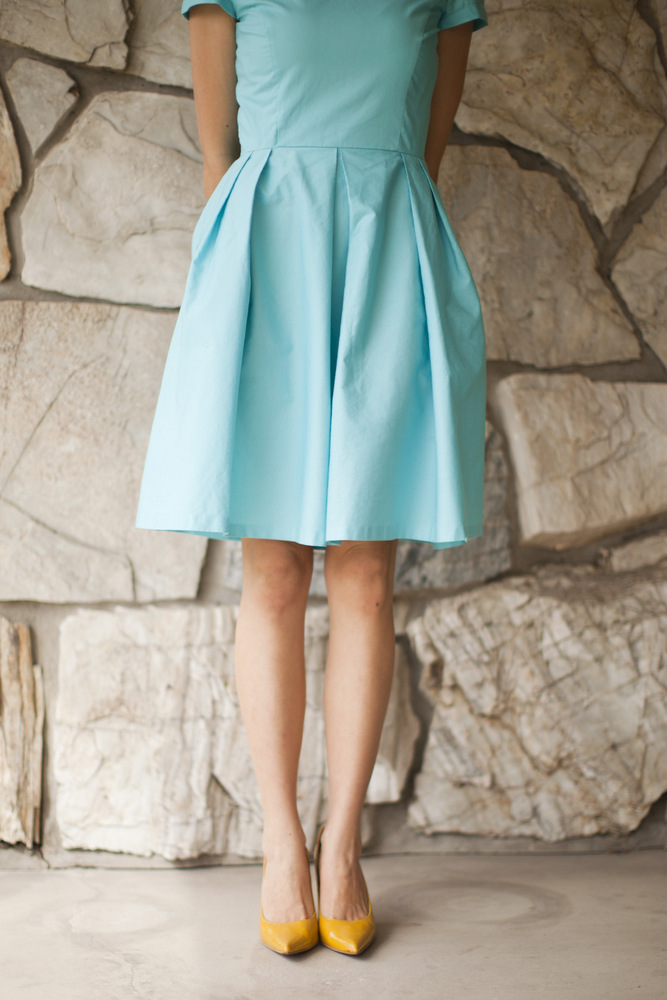
It was super windy when the pictures were being taken, so the skirt part of the dress didn’t look as neat as it usually is.  This is how it normally looks.
The lovely photographs taken by Jessica Peterson Photography.
9

TAGGED: DIY, Jessica Peterson Photography 64 Comments

Anthropologie Tangerine Flicker Dress DIY

April 9, 2012~ Refashion Revision, SEWING


Hello new and old friends, I am so excited to have you here! I love taking old, outdated clothes and transforming them into new and giving it a new life! I want to inspire people to learn to sew, even the basics so that they can alter their own clothes to make it fit perfectly to the body they have now, and having the clothes conform to their body instead of them trying to conform to that certain clothing size or that certain size pants. I hope you stick around for awhile! You can also find me at @sarahtyau on Instagram where I am the most active.


Inspiration: Tangerine Flicker Dress from Anthropologie $358.
I was so close to buying this dress when it was on sale.  Then when they had the extra 50% off of sales during the holiday season, I tried to find one but it was completely sold out.  So I was determined to make it and was about to buy some fabric when I found this dress online.
Very similar right?  You can still purchase the dress here.
*update: it’s now sold out, sorry!
I bought this lace from JoAnn’s. Regular price is $7.99/yard but I used a 50% off coupon. I found the same lace on Etsy, but JoAnn’s is cheaper, even without the coupon(since you pay for shipping on Etsy.)


After:
Photos by Jessica Peterson


(please disregard my no make-up face, will ya?  I’m trying to get used to this whole getting my DIY pictures done by a professional photographer thing… I feel a bit narcissistic, if you ask me.  I wish there was a way to blot my face out because I just want people to see the DIY project, not me.  So if you get sick of looking at my face(which I sure am), now and in the future, then please just bear with me. 🙂

v

What you’ll need:
– Dress
– Approximately 4-5 yards of lace(buy it here or here-online only shows black but in stores they have beige)
– Sewing machine
– Scissors
– Matching thread to the lace
– Liquid stitch
Directions:
Pin the lace along the dress: on the skirt, the sleeves, and the chest.  Sew the bottom half part of the lace onto the dress and the top curvy, wavy part, use liquid stitch to secure it onto the dress.
Estimated Time: 1.5 hours
Skill Level: a confident beginner
Price: $65
I saved over $300! 😉
You want to see more of my sewing DIY’s? Click here to see more!
3

TAGGED: Anthro DIY, DIY, refashion revision, sewing 99 Comments

modestify a LBD.

April 2, 2012~ SEWING

 dress c/o oasap, shoes c/o sheinside.
i’m so excited to let you know that from now on, i’ll be collaborating with Jessica Peterson, an amazing photographer, and also one of my dearest friends, with my DIY projects!  she is beautiful inside and out and has a gift to recognize and capture beauty through photographs.  her photographs are classy, sophisticated, clean, beautiful, and i don’t know how else to word it, but it looks very upscale and expensive.  haha, does that make sense?  just look at these photos, they’re one of my favorites.  so no more me-taking-the-picture-through-the-mirror photos, hooray! 
i modestified the dress by adding black fabric on the bottom of the skirt.  instead of picking out the seams of the bottom of the skirt, i added the extra fabric to the bottom of the skirt and sewed it along the already-there seams of the skirt.  i didn’t sew the bottom of the added-fabric since the fabric cut nice and clean without any fraying.  
project budget: very low(mine was $1-2 per dress)
estimated time: 10 mins.
level: beginner
romwe giveaway winner announced here.

1

TAGGED: DIY, Jessica Peterson Photography, modestify 24 Comments

modestify-lengthen short dresses DIY

March 20, 2012~ SEWING

when i’m shopping, i see many dresses that are really cute and think, “if only it was a little longer, i’d totally buy this dress!”  especially since short dresses are in style these days.  so what i do is buy them anyway and modestify-lengthen the dresses longer.  
before pictures of the 3 dresses i modestified.
black/cream bow-tie dress c/o Sheinside
before/after:
you can buy the cream/black bow-tie dress here, and the black pumps here.  
use code: Sarah20 for 20% off!  valid until april 30th. 
for the two black dresses i used this tutorial, and with the beige dress, instead of picking the seams of the bottom of the skirt, i just added the contrast fabric on the bottom and sewed it along the already-there seams of the skirt, then double folded the bottom part of the contrast fabric.  i also tailored the waist so it was more fitted and made the long sleeves into short sleeves. 
for me the black dresses are the easiest to lengthen out since finding a similar fabric to the dress is not that difficult since matching black to a black isn’t that hard, but with dresses like the beige dress above, it’s more difficult to find a matching fabric so unless you find a fabric of the same color, it might look tacky.  you don’t want the extra fabric to be noticeable if it doesn’t match, so the best option is to add a contrast color that compliments the color of the dress and add it on, making it look like it was originally made that way.
project budget: very low(mine was $1-2 per dress)
estimated time: 20 mins.
level: beginner

1

TAGGED: DIY, modestify 31 Comments

DIY: ted baker contrast bow swimsuit

March 8, 2012~ DIY DREAM HOUSE

inspiration: contrast bow swimsuit by ted baker $116

i love this swimsuit.  but the only size they had in stock was a size 34DD, and this might come as a  total shock to you, but i’m not a 34DD.  it’s hard to believe, i know, I told you its a shocker! 😉  so my next best option was to make it myself.
before/after:

i made a white bow waist-tie using extra fabric from my white swimsuit top that was a tad too long.  then i put it on my black one-piece swimsuit i already own.  i put snaps on the waist-tie so that i can attach it on any swimsuit i want!  so simple and easy but makes a big difference!
i am looking for a black one-piece similar to the original one but haven’t found one yet.  this is the closest i could find within my budget, but i love the clean lines of the ted baker swimsuit.  so if you see something closer, let me know, will ya? 🙂
1

TAGGED: DIY 18 Comments

  • « Previous Page
  • 1
  • …
  • 10
  • 11
  • 12
  • 13
  • 14
  • …
  • 27
  • Next Page »
cutmypic
Hello! My name is Sarah and I am so happy to have you here! Here you'll find DIY sewing, DIY home building & decor, honest and vulnerable posts of motherhood and snippets of my family. We are building our dream house and will update you regularly on our whole process from start to finish and I am also starting a mother-daughter sewing series. So I hope you stay awhile!

BLOG ARCHIVES

SEARCH

JOIN THE LIST

- THEME BY ECLAIR DESIGNS - Web Hosting By RFE Hosting -