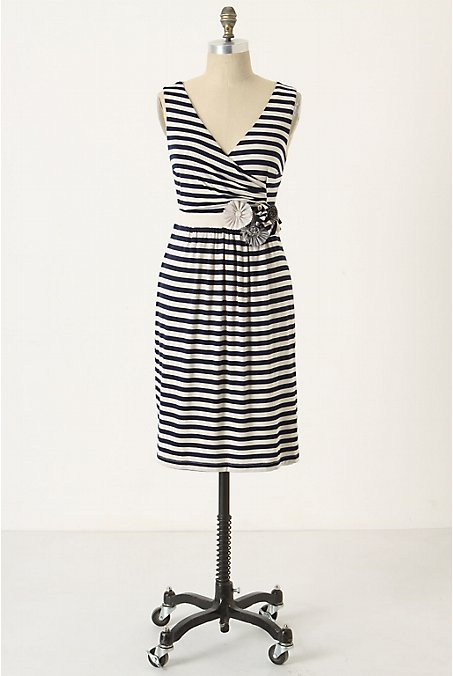
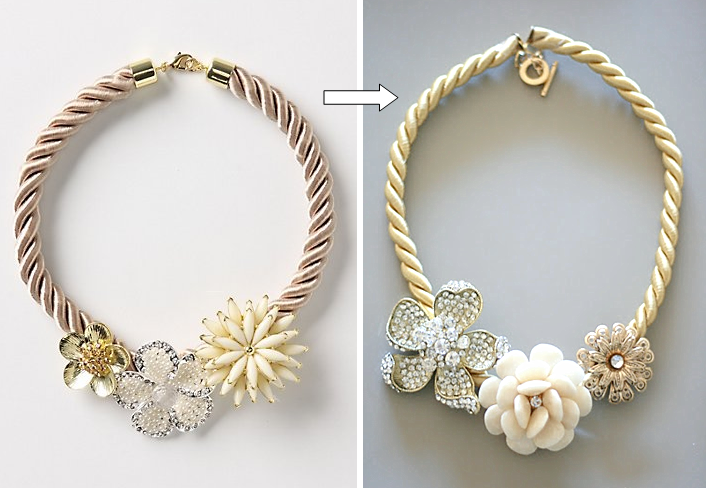
• ABOUT
  • COLLABORATE
  • CONTACT

Life is Beautiful

Motherhood, Sewing, Family

  • SEW
  • HOME
  • PARTY
  • TRAVEL
  • SHARING MY HEART
  • SHOP

Anthro DIY Marjorelle Necklace

July 26, 2010~ DIY DREAM HOUSE

My inspiration:

a marjorelle necklace from anthropologie.

gold rope(wal mart $1.20), epoxy, gold chain clasp, 10mm jump ring gold, 2 gold earring clasps(all from jo ann’s for .77 cents each kind), 2 flower rings(baker’s $8.00 each), one gold flower(from a necklace I had).
I took out the rings from the flowers and epoxied it onto the gold rope. Then I put clear tape around the ends of the rope from unraveling and then used the clasps, and the jump ring to connect it to the end of the rope on both sides.
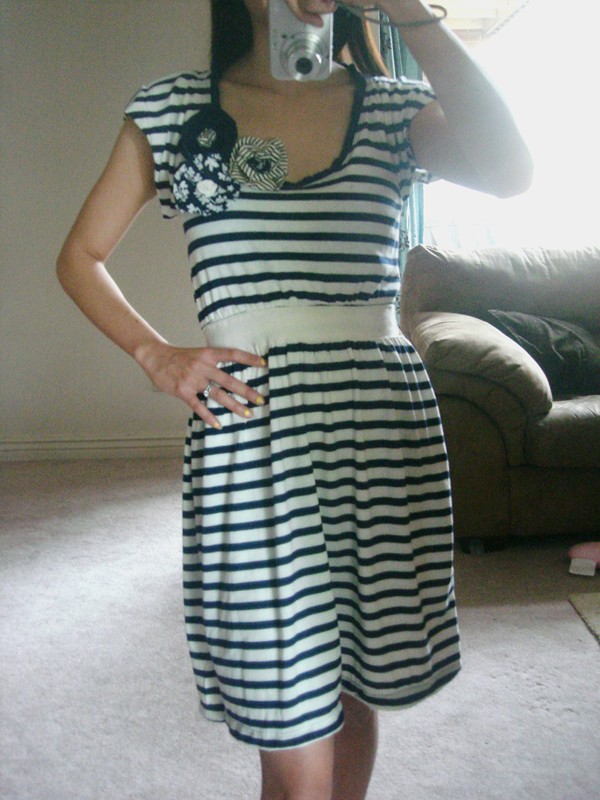
and TA-DA!


it took me about 15 minutes to make for under $20 bucks. I saved over $40!
1

TAGGED: Anthro DIY, DIY 58 Comments

Anthropologie Climbing Cowlneck

July 1, 2010~ SEWING

I apologize for the lack of posts. The charger to my laptop is broken so the only access I get is through my phone or at my parents’ house. Not to mention I went to Vegas for the weekend with my girlfriends with NO kids WOO HOO!

Not using the internet has been pretty nice though I gotta admit, and I realized I’ve been using the computer way too much and that I should focus on what’s more important like relationships with my family. So I don’t think I’ll be blogging everyday, maybe every other day or so.

But guess what!? I did work on a DIY project to not disappoint you readers out there. πŸ™‚

I bought this shirt for $5 at Old Navy in XL. I’m in love with light blue these days so I knew I had to buy it in hopes of making it into something cute.

My inspiration came from this Climbing Cowlneck top from Anthropologie. after a few hours and a few days later:

Regular price: $48
I saved over $45!

*I had so many requests for a tutorial for this one that I couldn’t resist. πŸ˜‰ The only problem is the shirt is already made so there are n0 step by step pictures. But I can take detailed pictures of the after and explain the how-to’s as best as I could, does that sound good? good, here it is!

I altered the XL shirt into a XS first. I did that by putting a xs shirt on top of the shirt and then roughly measuring how much to cut. Then I cut up the sleeves into a cap sleeve, and cut up the sides. I sewed up the sides and left the sleeves alone. I also cut up the neckline hem so it’s just a open hem. One important thing to note is that the front of this shirt will end up to be the back of the shirt and the back will be the front of the shirt. This was necessary since the neckline has to be pretty high enough to be able to create the draping for the cowlneck effect.

after the shirt is altered, I worked on the sleeves. you pinch about 1/6″ inch of the fabric and sew it straight line horizontally, from the start of the neckline to the end of the sleeves. reverse a few times to make sure the stitches are in place. (sorry i don’t know the term for it, I’m not an expert seamstress!) I did 17 lines in the front and 16 lines in the back. (the only reason why I did so many in the back was because since it was a XL, the neckline was very low. You don’t have to do the back at all if the fit is just fine.) the spacings between the lines are roughly 1/2″ apart.
this is how the back should look. now repeat on the other sleeve.

for the sleeves to be not so futuristic looking and stick out straight on the shoulders, I gathered the end of the sleeves by sewing on stitch length 5 and pulling it together to give it a “curved, round” look.

then right on the back part of the shirt, I did the same as I did on the sleeves but only 8 lines VERTICALLY. I only did this because the XL shirt was too wide for me.
the back of the seam

the view of the back of the shirt. (remember this is actually the front of the shirt when no alterations were done.)
then on the right side of the shirt, I did the same technique I did to the sleeves except it gradually gets longer per line, the longest line being the middle of the shirt. One line after the other is about 1/3″ shorter or longer.

and you’re done! I hope I made sense! πŸ™‚
featured on:
Hope Studios
The Train to Crazy
0

TAGGED: Anthro DIY, DIY 79 Comments

Anthropologie DIY-Bamboo Garden Dress

May 25, 2010~ SEWING

My inspiration this week was a dress from….you guessed it, Anthropologie. Right when I saw this dress online I thought, hmm I have a yellow dress in my closet…

This dress is about 6 yrs. old from GAP. It’s a little big now and I think I’ve worn it once in the past 4 yrs.

This top is also from GAP about 6 yrs. ago. It’s the same color as the dress above so I cut up this shirt to use for the extra fabric.

My after……….

(do you like how my daughter made it in the picture? She’s just sitting on her litttle lawn chair, just chillin’. πŸ™‚

I cut up the shirt into a long strip about 5″ wide and I also cut up the bottom of the dress because it hit me way below the knee which is a fashion no no for us shorties. And I used those extra fabrics for the waist-tie for the dress.

And instead of doing a gather like the one in Anthro, I twisted the fabric instead.

I didn’t take in the sides of the dress since the waist-tie did the work of making it smaller. It was a side-zipper anyhow so it would’ve been too much work to alter the sides.

This dress from Anthro is $218. And since my dress and the top was from my closet- it was free! πŸ™‚ I saved over $220!
And thanks to all those that are voting for me as Oprah’s next T.V Star! Please keep voting for me until July 3rd!
Featured on:
Kojodesigns
Avidaccents
CreativeItch
0

TAGGED: Anthro DIY, DIY 49 Comments

Anthro Inspired DIY-Striped Dress w/ flowers

May 17, 2010~ SEWING

DId you miss me last week? πŸ˜‰ This week I turned a XL tank dress into a XS flutter-cap sleeve dress, inspired by this dress from Anthropologie.


I bought this dress on clearance for &7.99 from Old Navy and I first altered it by shortening the waist area(cutting it and re-sewing the waist), took the sides in about 3 inches from both sides, and used that extra fabric to add the sleeves and the flower.

And the result…

Instead of sewing on the flowers, I made it into flower pins so that I could wear the dress and the flower pins in many different ways.
just plain

flowers on the neckline, or on other shirts.

I used a white waist-tie I had in my closet that once belonged to a cardigan for the waist.

I also used old scraps from old projects I saved up for the flowers.


It is so comfortable, I love it. Not to mention I just saved over $120!
0

TAGGED: Anthro DIY, DIY 37 Comments

Anthropologie DIY- Lace Cardigan

May 3, 2010~ SEWING

My project this week:


I’ve been looking for an oval-shaped stone ring for awhile so when I saw these real Jade stone earrings, I was so excited! I just took out the earring post and bought a faux gold ring and attached to it. I bought a Krazy glue that’s for metal to attach the stone to the ring but is there something better? The stone is quiet heavy so I’m afraid the glue won’t hold it in as good. Maybe a glue gun would work? I would love to get tips from you amazing crafty mothers out there.

Anywho, since it was an earring set, I have one more jade stone ring so if you would like to purchase it, then click here. It’s only $20. And plus, we can be BFF’s and have the same ring! πŸ˜€

Onto my next project:

I was inspired by this cardigan from Anthropologie, priced at $118.

I bought this size XXL cardigan from Old Navy. (That was the only size left) And some lace.
Then I cut up the sides and the sleeves and sewed it back on after cutting the extra fabric.
Then I sewed on the lace about 1/5″ to the hem. I thought lace in the back around the neckline would be cute so I did that but the lace kept cuffing up and folding so I just cut it off. Then I used liquid stitch(my first time using it and it’s awesome!) on the other edge part of the lace so it doesn’t air up when I move.
And my result:

I thought about adding pearl buttons but it would make it look more dressy and it would take attention away from the lace so I decided to leave the original buttons to keep it a more simple/casual style. It’s really light and soft so it can be worn in the summer, especially on cool summer nights. 
2

TAGGED: Anthro DIY, DIY 57 Comments

  • « Previous Page
  • 1
  • 2
  • 3
  • 4
  • 5
  • Next Page »
cutmypic
Hello! My name is Sarah and I am so happy to have you here! Here you'll find DIY sewing, DIY home building & decor, honest and vulnerable posts of motherhood and snippets of my family. We are building our dream house and will update you regularly on our whole process from start to finish and I am also starting a mother-daughter sewing series. So I hope you stay awhile!

BLOG ARCHIVES

SEARCH

JOIN THE LIST

- THEME BY ECLAIR DESIGNS - Web Hosting By RFE Hosting -