• ABOUT
  • COLLABORATE
  • CONTACT

Life is Beautiful

Motherhood, Sewing, Family

  • SEW
  • HOME
  • PARTY
  • TRAVEL
  • SHARING MY HEART
  • SHOP

Have you decided on a Halloween costume yet?

September 18, 2013~ SEWING


With Halloween nearing us next month, I wanted to share with you one of my favorite costumes I made for my kids, which is this mermaid costume!  It was easy to make and it’s a perfect costume to dress your infant in who can’t walk yet.
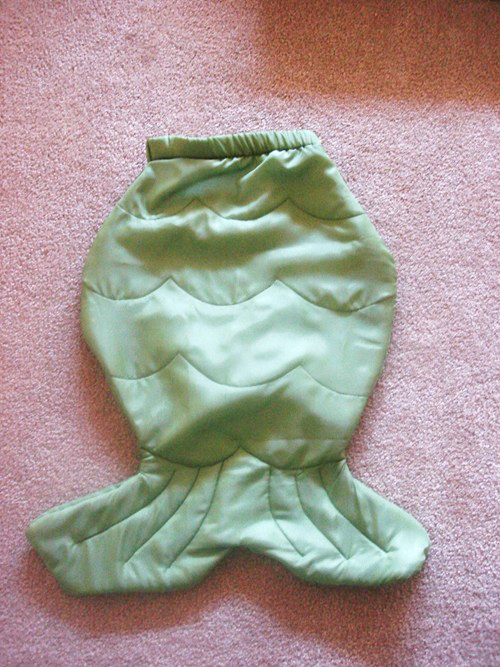
For the mermaid tail:
1. Put the green fabric and the thin cotton form on top of the other, and cut it in to two mermaid tail shapes.
2. Sew the green fabric and the cotton together in the wave lines.
3. Sew the edges on the cotton side, flip it over and add elastic on the waist.
4. Sew the vertical fin lines on the bottom.
For the sea shell bra:
1. Cut 4 sea shell shapes.
2. Put two felt shells together and sew 4 vertical lines on it.
3. Repeat on the other two sea shells.
For the headband:
1. Cut 3 mini sea shell shapes
2. Sew 4 vertical lines on each of them like the sea shell bra.
3. Glue it onto the elastic headband.
my favorite part was her mermaid fin popping out of her stroller!

Are you dressing up for Halloween this year?  If so, what will you be?  I’m still thinking of a Halloween costume for our family of 5, if you have any good ideas, send them my way!

0

Leave a Comment

Jay’s DIY

November 9, 2012~ SEWING

When Jay did Tough Mudder, he decided to make his own tank to wear to the event.  So he cut up a t-shirt and sewed the sides.  It was his very first time using my sewing machine(if not his first time ever using a sewing machine), and it turned out… well, you decide for yourself.

Jay wants me to tell you that if anyone wants a tutorial on how he made this shirt, just holler & he’ll be more than happy to do one for you.
1

TAGGED: Jay's DIY 16 Comments

Reader Showcase

October 3, 2012~ SEWING

Here are the DIY’s made by these talented ladies.  They all did a wonderful job, didn’t they?

Valencia from the Buildeth her House blog:  

I love the bright aqua color, it looks so good on her!
(inspired by the torsade tee tutorial)

Dandelion from the On the Florecilla Side of Life blog:
The polka dots makes it more fun and flirty.
(inspired by the one after another cardi tutorial)

(inspired by the sequin stripe tee tutorial)

Dusti from the Want to Get Crafty blog:
Hers looks exactly like the original, she did such a great job.
(inspired by the squeeze box top tutorial.)

Andrea from the Something Good blog:
The color red is perfect for the holidays.  And what an adorable little girl!
(inspired by the 15 min. ruffle dress tutorial)

Wanilza from the Chero De Vanilla blog:
She managed to make it exactly like mine, except in white!  You can never have enough white shirts, in my opinion.  
(inspired by the ruffle around me top tutorial)

Becky from the Blue Belle Lovely blog:
I love the navy blue polka dots, and how she wore it with a brown belt.
(inspired by the pleated dress tutorial)

Lexi from the Sunlight and Sequins blog actually made 3 video tutorials!  They’re well made(and her voice is beautiful and pleasant to the ears too!).

1(above). flower embellished t-shirt tutorial, inspired by the ruffled flower top tutorial.
2. ruffle embellished t-shirt tutorial, inspired by inspired by the ruffle around me top tutorial.
3. lace embellished t-shirt tutorial, inspired by the uninterrupted ruffles top tutorial.
To view the previous DIY’s made by you, click here, and here.
To submit your own DIY’s inspired by this blog,  please send the following information to:  sarahmchoi{at}gmail.com
1. Your first name and where you’re from.
2. A picture/video of your DIY along with the link.  Send me as many as you want!
3. A link to your blog/website(if you want me to link to your site).

0

TAGGED: reader showcase 4 Comments

DIY: tailoring dresses. lots of it.

September 10, 2012~ SEWING

I tailored a ton of clothes.  Once again, very simple, but it makes it so much more flattering to the body.

Before/after:

I modestified this dress a long time ago in this post, but the dress shrunk and lost some of it’s length.  I bought the closest green fabric available and added some length to the dress.

|Dress: F21|
With this dress, I just took in the waist part of the dress to make it more fitting.  It’s hard to tell but if you look closely, the waist part in the after picture is taken in so it looks more hourglass. The bottom hem was a bubble hem so I cut the linen part and then resewed the hem, so it lengthened it just a tad.
|Peter pan collar dress: Ministry of Magic(c/o) | 
With this dress, I lengthened it by adding black fabric, and tailored the sides of the dress to make it more slim fitting.
|Gold sequin-sleeve dress: Oasap(c/o)|
I forgot to take a before picture of this dress(darn it!), I was too excited to tailor it so I could wear it.  It wasn’t a huge change, it looked a lot like the above black dress before it was tailored.  I took the waist part in to make it more figure flattering.

|Cream lace dress: Ministry of Retail(c/o)|
This dress was like a tent.  It was way too big, way too long, not flattering at all.  I took in the sides, the length(to make it shorter this time), and sewed the low v-neckline together to make it higher.  
|Striped maxi dress: TJ Maxx|
Whew, so there you go.  Next week, I will be showing a DIY that’s one of my favorite DIY’s I’ve done so far.  And I don’t throw those words around easily, so it’s going to be a good one! 

0

TAGGED: DIY, DIY tailoring 21 Comments

DIY: tailor & add sleeves to a dress

August 13, 2012~ REFASHION RUNWAY, SEWING

I don’t know about you, but I prefer to wear dresses over pants or skirts any day in the summer since it’s much cooler, and way more comfortable.  I got this dress at Kohl’s(for $4!) but the chest/waist part was a little loose.  So I tailored it smaller and used the lining of the dress to make the sleeves.


Before:
*I just cut the back side of the lining and used this tutorial to add the sleeves.
*I made the sleeves too small(short) for my liking, so I plan on making a bigger one.  But in the meantime I’ve been wearing a cream colored cap sleeves under it which works fine too.
After:
{Dress: Lauren Conrad by Kohl’s | Shoes: Payless(really old)}
Skill level: a confident beginner
Estimated time: 30 minutes
Budget: none
The after photos by Jessica Peterson.  She is amazing!


0

TAGGED: DIY, DIY tailoring 26 Comments

  • « Previous Page
  • 1
  • …
  • 17
  • 18
  • 19
  • 20
  • 21
  • …
  • 31
  • Next Page »
cutmypic
Hello! My name is Sarah and I am so happy to have you here! Here you'll find DIY sewing, DIY home building & decor, honest and vulnerable posts of motherhood and snippets of my family. We are building our dream house and will update you regularly on our whole process from start to finish and I am also starting a mother-daughter sewing series. So I hope you stay awhile!

BLOG ARCHIVES

SEARCH

JOIN THE LIST

- THEME BY ECLAIR DESIGNS - Web Hosting By RFE Hosting -