before i get to my DIY project, I have 2 updates.
first is, with receiving over 150,000 page views last month and highs of over
12,000 page views per day, i’ve decided to take in sponsors! i’d love to sponsor
you so please email me for rates at: sarahmchoi{at}gmail.com
and one of my DIY’s was used for a window display at Lily & Iris, a
bridesmaid dress boutique, designed by Mood Events & Production. can you
guess which one it is?
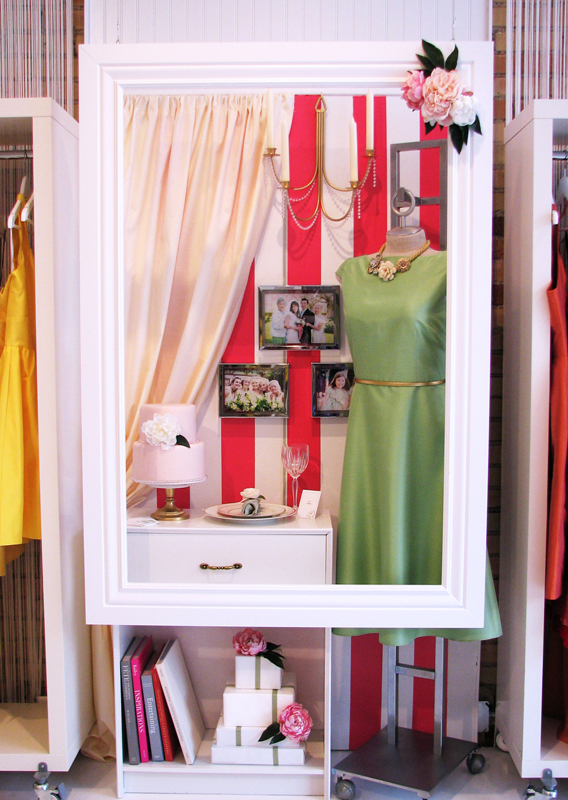
photos taken from salt lake bride & groom

isn’t it exciting?
and now on to my DIY project this week:
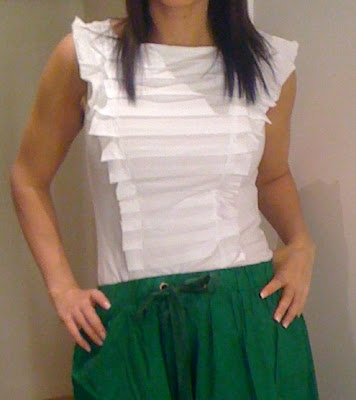
inspiration: squeezebox top from anthropologie $48

picture from an anthropologie review blog.
i think i literally gasped when i saw this top online. i instantly fell in love and knew i had to have it!
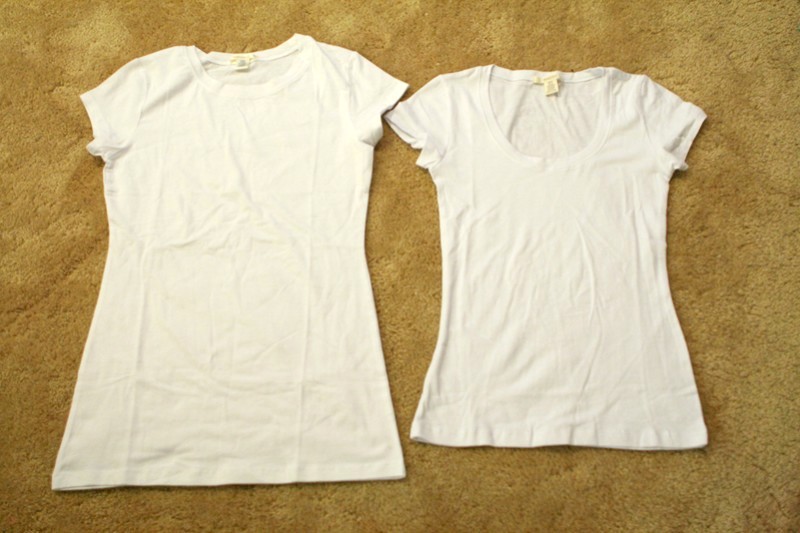
i bought 2 white shirts, one in xs which is my size and one in large. i got the large shirt in round neck for more fabric while i got the xs in a scoopneck.
you’ll need:
2 shirts
scissors
matching thread
pins
estimated time: 1-2 hrs.
project cost: very reasonable(mine was $8 for both shirts)
skill level: advanced beginner to intermediate

1. take the large shirt and cut it into two pieces, a front and the back piece.
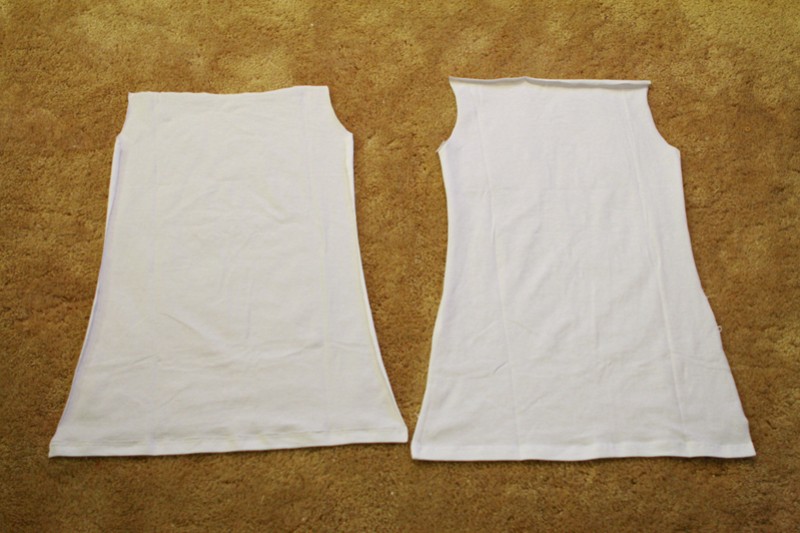
2. cut the arms and the neckline off so it’s closest to a rectangle shape.

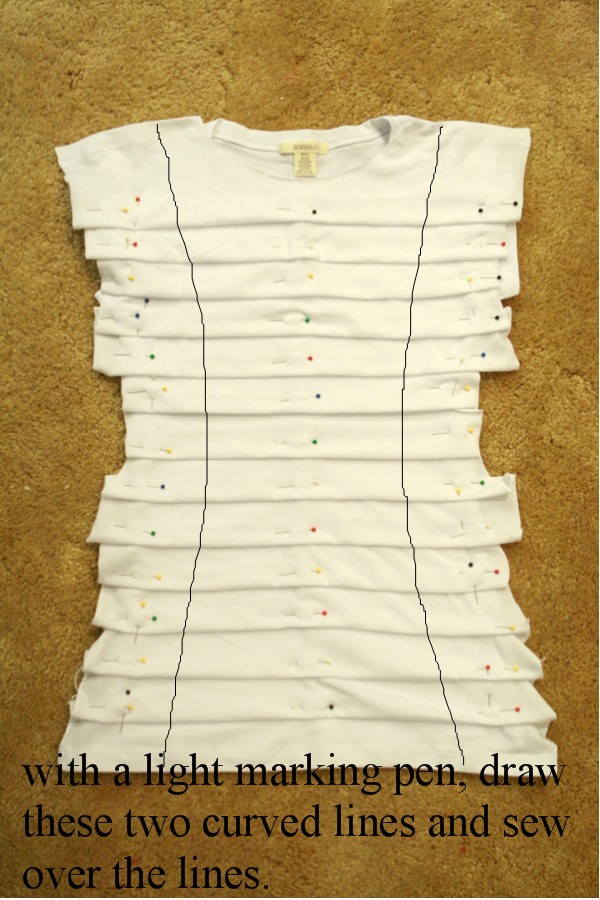
3. take one of the piece and begin making the pleates.
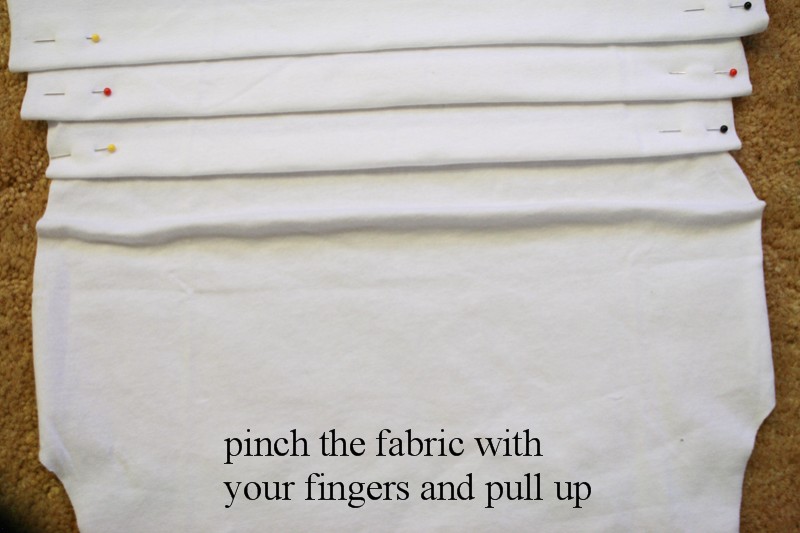
4. (instruction written above)
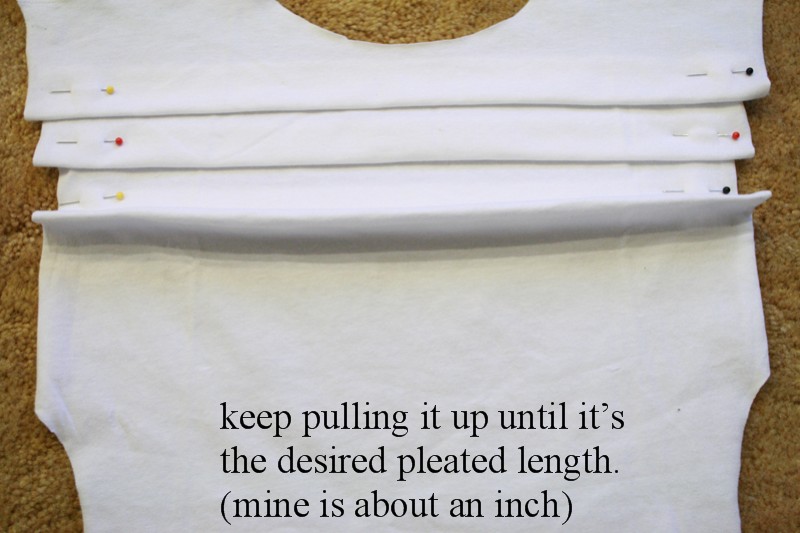
5.

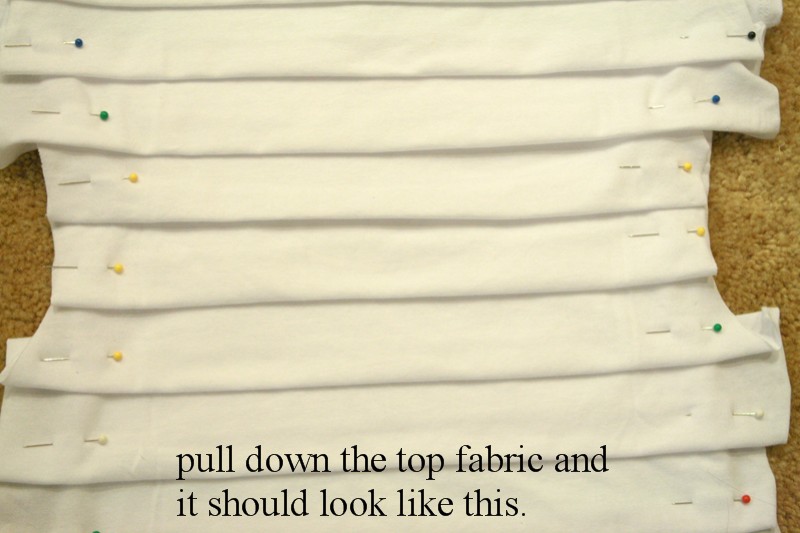
6.
and then with the bottom pleated part

7.

8.

9.
10.
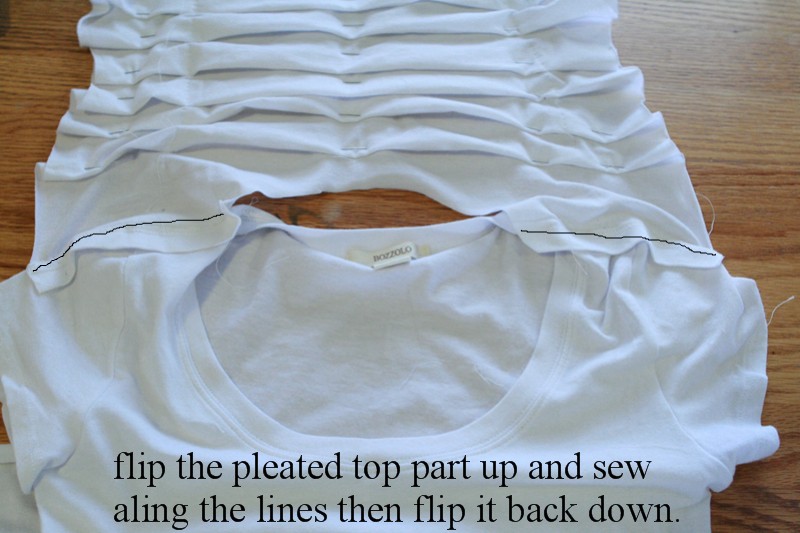
11. oopsie, mispelling. it should be “along” instead of “aling”. 😉

12.

13.
14.

15.
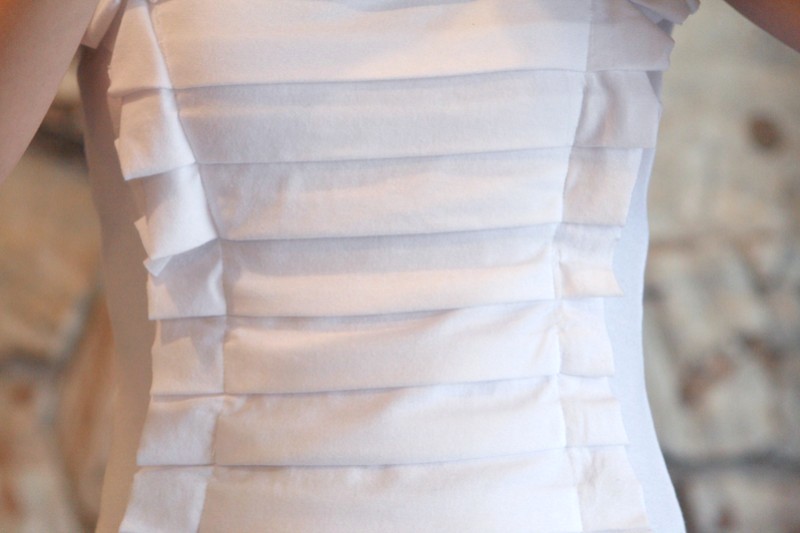
and you’re finished! TA-DA!!!


 |
I saved over $40!
You've done a wonderful job, looks amazing! Thank you for sharing such a detailed tutorial!
Love that neckless~ Will you teach me how to do it when i go to Utah?
xoxo
Vanilla Day
I love this! It looks to easy to be true! I am hosting a link part this afternoon, I would love it if you linked up. http://untilwednesdaycalls.blogspot.com/
After the Bad Case of the Stripes dress and this, you have a new happy follower!
Congrats on the successful numbers! You are one of my fave blogs to follow, you will do great with sponsors.
This shirt is awesome, I have already seen it featured places and am in love 🙂
Love this! I want to make one now too!
I'd love it if you'd link up with me Tuesday:
http://itssewforyou.blogspot.com
Melissa!
This is lovely! I am already thinking about what is in my closet that I could use for this – thank you for sharing!
That is so adorable!! You are very clever to figure all that out, and make it look professional.
Great Job!
Jeanene @ thequeenbeeshive.com
oh i REALLY love this. i will make it as soon as my life as a student calms down for two seconds
jaciebowen.blogspot.com
Yessss! I've been eye balling that same anthro top for a while. I knew it could be done DIY, I just hadn't gotten around to playing with it. And now you have! Thanks for the tutorial!
Really a very good job,
Congratulations, Yolanda.
I had not yet seen this anthro shirt but I LOVE it and will definitely have to make myself one!
I do love that top. Thanks for the amazing tutorial. I believe that one can NEVER have enough white tops. I will bookmark this so I don't forget about it.
Great job I love it!!
xoxo
Kelli @loveoursimplelife.blogspot.com
Oh My gosh this is so beautiful.. You did such a wonderful job. Perfect.
This is adorable!! Great tutorial as well. I love how simply you made it seem. I am definitely going to try this!
http://the-polka-dot-umbrella.blogspot.com/
Wow..that came out REALLY nice…well done! 😀
BTW, award for you on my blog. 🙂
I tried this top on at anthro! This is amazing! I wish I had better sewing skills. I am a new follower too.
Wow, very cute, and you make it look so easy!!
I LOVE it! And it is so easy! I will have to try it.
http://www.mylifeunzipped.blogspot.com
Gorgeous! I've been waiting for you posted this on your blog so I could link to it! I am featuring it today at somedaycrafts.blogspot.com. Grab my "featured' button.
Love, love, love this shirt. Found your blog on "We Did It", and so glad I did, lovely ideas.
Jen
http://shimistore.blogspot.com/
You are amazing…I could never do what you do with old clothes.
brilliant! don't know that it would look right on MY body but I love it!!
Vanessa
Dilly Dally
http://daily-dilly.blogspot.com
Thanks for linking up to Take-A-Look Tuesday over at Sugar Bee Crafts – I featured you today! – Mandy, http://www.SugarBeeCrafts.com
@lerae: of course i'll teach you! just come over and visit already! 🙂
and thank you so so much everyone. it means a lot to me.
Good Morning Pretty Lady…..another brilliant redo!!
I bow to the master ;->
Janet xox
http://theemptynest-janet.blogspot.com/
I just found your blog and am your newest follower. While I don't sew, you have left me totally inspired and contemplating pulling out my moms old sewing machine! Thanks for the fabulous blog and inspiration.
After making lots of knock-offs, I just visited my first Anthro store this week! This shirt is amazing. Thank you so much for the tute! Would you mind if I featured this on my blog on Friday? http://www.fastdaze.blogspot.com
Amazing! You are so talented, I LOVE that shirt! So glad you shared it!
This is amazing! My daughter needs one of these. Thanks for sharing it. I found you on Blue Cricket. Please visit me at http://barbwired0117.blogspot.com/
I absolutely love this. It turned out awesome. I love to sew and create, but I don't have the vision to alter clothing. You are very talented. I would love for you to link up at our new link party.
Amy
@SistersoftheWildWest.blogspot.com
ohhh, turned out sooo nice! i am buying t-shirts tomorrow!
CHEERS,Sibylle (fun.kyti.me)
Simply needed to feature this shirt – it is so fabulous!
http://www.mesewcrazy.com/2011/03/friday-sew-crazy-features.html#more
This is absolutely gorgeous, very impressive!
Just ingenius! Love it!
WOW! that turned out GORGEOUS!!!!!
we would love it if you could link up w/ us this weekend 🙂
lollyjaneboutique.blogspot.com
you are sooo crafty!! love what you made! 🙂
just discovered your blog through In Honor of Design, and love your DIYs!
Just found your blog from Diary of a Preppy Mom and I'm stunned by your creativity. I love this top and can't wait to check out your other tutorials. Amazing! Thanks!
Have a great day!
I featured this today! Go by and grab a button!
I did your tutorial and linked up over at Crafts by Holly. Thank you for the awesome idea!
http://www.craftsbyholly.blogspot.com
That's gorgeous! I just found your site last night and I adore it! …I also love that your Husband calls you "Wifey" cause mine does too ;o) Hope you're having a great weekend!
This is my favorite shirt. I wrote about it on my blog: http://wanttogetcrafty.blogspot.com/2011/04/imitationflattery-anthropologie.html
Thanks for the great idea.
i loved it very much and i'll try it with opposite colours:)
loves from Turkey
Great job!!! I love it and I'm going to try and then when I finish, I'd like to write it on my blog with a link to yours!! Thank you!
http://quepuedohacerconesto.blogspot.com/
şahane fikir 🙂
Wow you are so sharp good job! Please keep them coming. A big THANK YOU from the less imaginative prople out there like myself
Where did you buy the t-shirts? My list of great t-shirt ideas is accumulating, and what's holding me back is I'm not sure to go for great-fitting feminine shirts like that at that great price.
Thanks!
Love it! I think I need to go goodwill t-shirt shopping 😀
thank you for this DIY.
lovely!
I share it in my blog. is it ok?
http://girlielittlethings.blogspot.com/
I got the shirts at GEN X, they sell great plain cotton shirts for $4!
Just left a comment on your blog post, thanks for the feature and for your sweet words!
thank you once again..:)so nice to have comments from you:)
Love, Love your blog and all your fantastic ideas. You are very creative and talented!
Donna at http://www.alterinterior.com
You are so sweet, your comment just brightened up my day! Thank you.
xo
Hi Liz, I'm not sure if I replied back to you a year ago but if I didn't, I'm so sorry! Of course you can feature it on your blog, I'd be honored! And wow, you visited your first anthro, isn't it amazing? 🙂 thank you so much for your comment!
xo
Thanks for the tutorial! I have a question tho, Did you have to bunch up the Shirt like a sock so that you can sew from the shoulder down? I am tempted to make this shirt from scratch with knit fabric.
Hi Michelle!
I'm not sure what you mean by bunching it up like a sock but I folded the neckline and the sleeves twice and sewed it. Hope that helps and thanks for your comment!
Hi, um…what do you mean by pull the lifted part?
I should've said pat down or push down the lifted part.
xx
I love the t-shirt, I would like to do a DIY like yours.
xoxo
WOW! I know I'm not really saying anything that hasn't been said before – but thank you so much for figuring out how to get this look the easier, guilt-free way (unless you've got that kind of cash to drop on a t-shirt – more power to you, then!)Conceptually it is on par with way-beyond-ingenius. Thank you for sharing your awesomeness in this tutorial, which, like all your tutorials, are so wonderfully clear, simple, and concise – but without ever compromising on content detail or clarity. So – thanks so much for sharing; and I'm happy to hear your blog is getting the attention it deserves!
Can you tell me how you sewed the piece onto the shirt?
This is so awesome I have to try it!
Thank you for sharing this tutorial!
http://seelovemake.blogspot.com
Thanks so mich for sharing – this is lovely!
Thank you, amazing job! This was the information I required.
math help online
You are the sweetest thing, thank you! Thank you for your kindness and for reading my blog. 🙂
I laid the pleated top on the shirt and sewed the front part of the shirt and the pleated part together. Hope that makes sense!
I love this shirt! SOOO cute!! I am your newest follower and can't wait to see your other projects. 🙂
-Kayla from Love Sparkle Pretty
WOW!! SOooo trying this!!!
This looks so cool 🙂 I want to try it, but I'm not sure I understand the instructions completely – Did you use both halves of the large shirt for the front pleat? Or just one? And in the picture where the sleeves and neckline are cut into a rectangle, did you cut a second neck line into it later? In the picture there looked like a curved cut, but the directions didn't mention it.
Sorry if I'm a bother by asking ^_^
Hi Lovely tutorial .. I am making this.. I already purchased two t shirts.. But I could not get the bigger one in scoop neck , hoe it should be ok ? 🙁 .. In step 14 How to sew along the lines.. Wont the back of the Tee come in between? Hope you will find time to answer 🙂 Have a great day and thanks for sharing..
Hi!
It doesn't have to be a scoopneck, it should be okay! And sew along the lines on step 14 with just the front part of the shirt and the pleats. So open up the shirt and pull it through the sewing machine so the back part of the shirt will be untouched. Hope that helps and hope it turns out great!
Sarah
I used one shirt to use for the pleats, and used the other shirt as a base. And yes, I cut the neckline in a round neckline, I should've clarified! I'm adding it to the directions, thanks for letting me know!
OMG GORGIOUS!
Iam going to make this one!
I made it. Click here t view my version . Thanks for sharing.
So you used just the front portion of the cut shirt for the front? I guess I am not totally clear on that? Can the smaller shirt be used as the cut shirt if the sizes are pretty close? I got my shirts from Michael's on clerance for 1.99 each and they didnt have large.Thanks for sharing your creaitiveness with the world!!
Did you sew it from the top or bottom of the shirt? Details on this would be greatly appreciated.
The blog is good enough I again n again read this.bubblegum casting reviews
nice tutorial ! I will share in my pinterest ,if you ever need plain blank t shirt for your projects let me know I can help.
Great tutorial!! Thank you for making it 😀 I'm not sure I understand every step but I'll try. I have a few questions though. What do you think is the best material for this diy, thick or thin? What type of stitch did you use for the curvy stitch? Lastly, do you think this diy can be done without a sewing machine? Like can I hand sew it? Hope you can answer this question bcs I'd really love to try 🙂 Have a great day!! I love your blog and all the tutorials!
Great tutorial!! Thank you for making it 😀 I'm not sure I understand every step but I'll try. I have a few questions though. What do you think is the best material for this diy, thick or thin? What type of stitch did you use for the curvy stitch? Lastly, do you think this diy can be done without a sewing machine? Like can I hand sew it? Hope you can answer the questions bcs I'd really love to try 🙂 Have a great day. I love your blog and all your tutorials!!
Hi Stella!
Thank you for reading my blog, it means a lot to me! My material for this shirt was just a plain spandex/cotton top. So the material was pretty thin, I would recommend not using heavy or thick material or i would assume it wouldn't fold as nicely. I just used a straight 2.5 stitch length for the curved part. I would recommend tracing the lines with a invisible marker or a marker and then just stitching along the traced lines, I didn't the first time and I had to unpick and do it again, I thought I could just eye it out but I was wrong. 🙂 It can be done without a sewing machine but it would take a really really long time. I hope I answered all of your questions, let me know if you have anymore! Best luck and I would love to see if you make one!
Sarah
Good post. I learn something totally new and challenging on websites I stumbleupon everyday.
It will always be helpful to read articles from other authors and practice something from other web sites.