inspiration: a top from banana republic
(which i started just liking about a year ago.
i always thought it was too old and boring but now i love that store!
either my style’s changed or i’m now old hahaha)

anyway…so this was my inspiration BUT it didn’t end up looking like this.
because? i couldn’t figure out how to do those dang braid things! haha
it looks like just two loop braids but i cannot figure it out!
(unless i make seperate loop for every one of them)
do any of you know how?
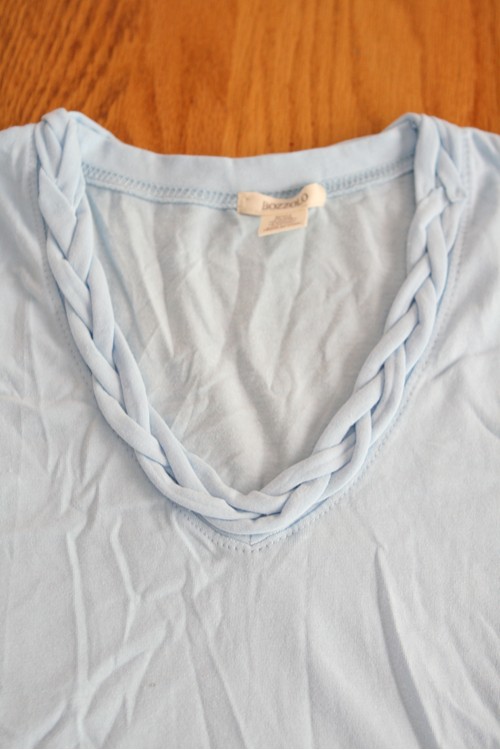
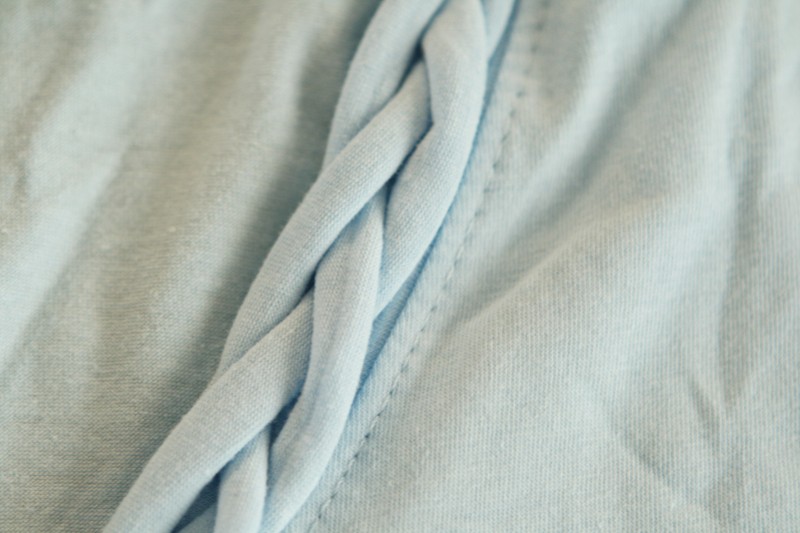
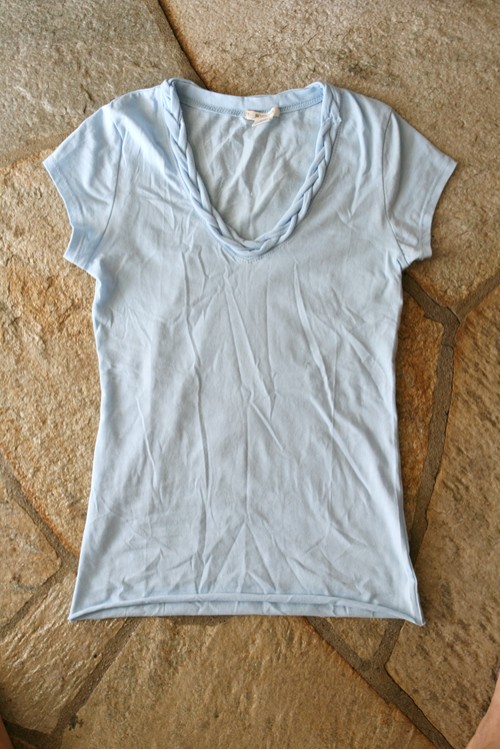
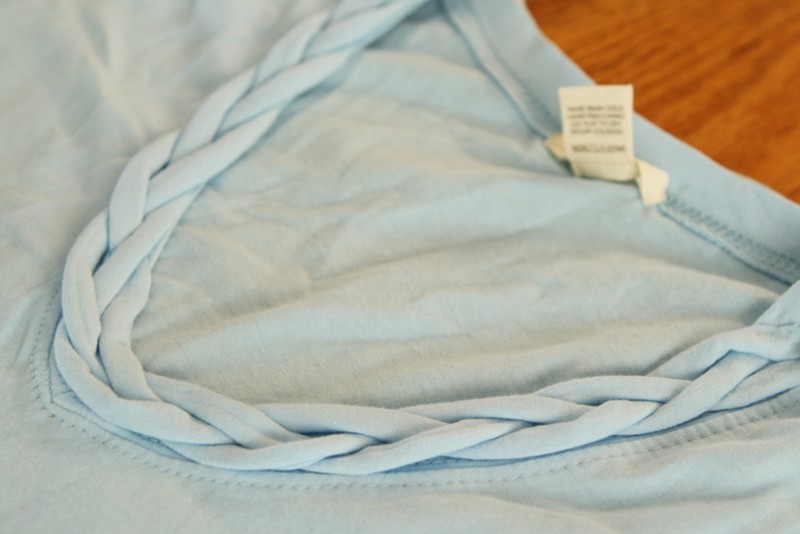
so this is my version. i just stuck with a traditional braid

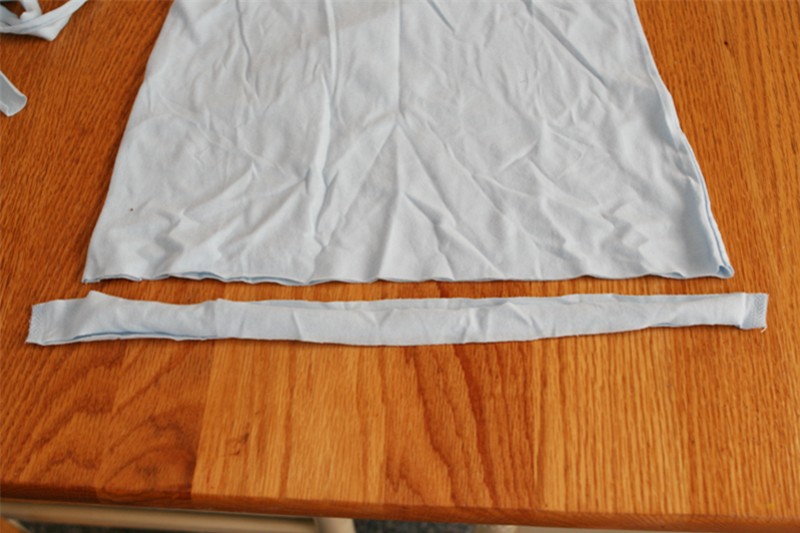
got a plain light blue shirt

cut 3 strips from the bottom of the shirt since it was extra long
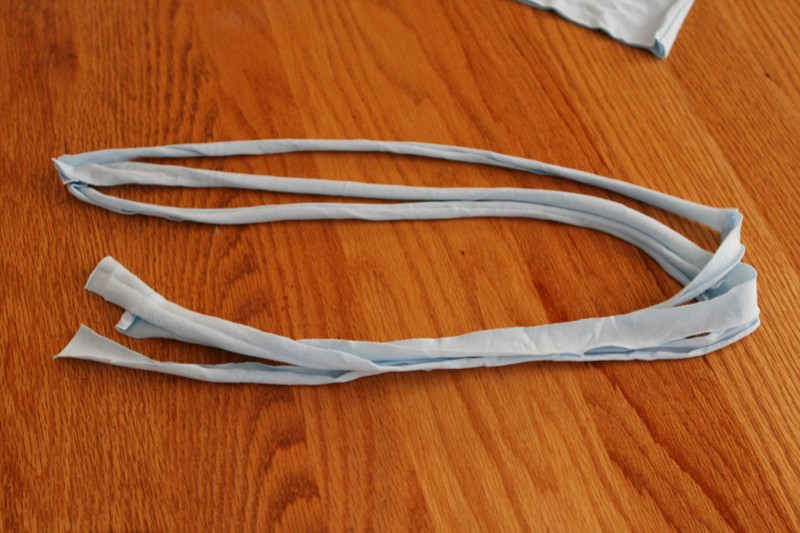
pinned the top and started braiding. i did it very very loose.

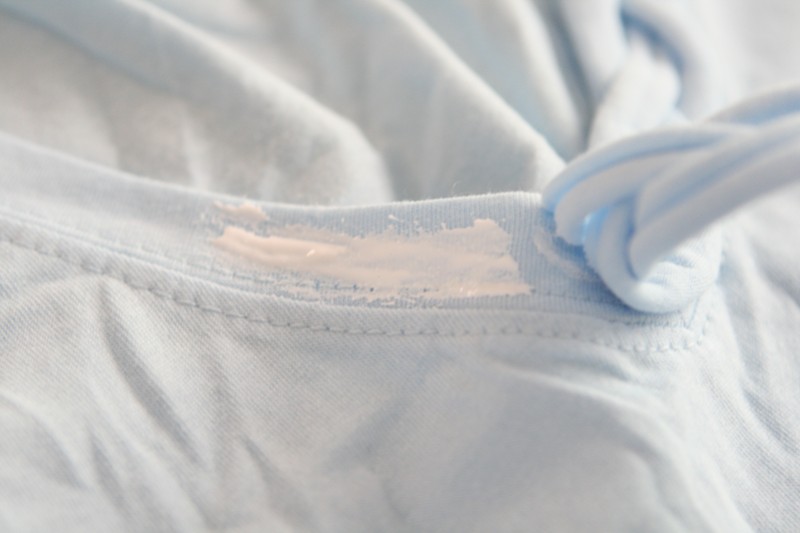
then using liquid stitch(oh how i love thee!), i glued the braids onto the neckline
and there you have it.
(can you tell i despise ironing?)

Great DIY! I have to try it too 🙂
hi 🙂
another fab tutorial
the original braid looks like it has been done with what is called navaho ply, which is similar to a chain stitch when you are crocheting. hope that helps 🙂
you know…even though it was a "fail," i totally love it! kudos to you!
I think it looks great anyway!
I agree with Mad Madame Mel that the original looks similar to a crochet chain stitch, or maybe like the "finger stitch" (not sure if that's what it's really called) that I used to do when I was a kid.
Awesome tutorial thanks ^___^
xx
what I was going to say is already stated – it's hand crochet – chain stitch, but yours look good too. Tone
Hey Sarah! Ok, the braid is a finger crochet chain. It's super easy to do! 🙂
Take a strip of your T-Shirt and make a loop knot so the loop and knot are secured, pull the tail of the T-Shirt through the loop and continue… make another loop, pull through… keep going! Depending on how tight you want the chain to be you will need to experiment. It comes out super easy you do worry about starting over! 🙂 Did you get all that?
Meg
I agree with Mad Madame Mel. It's a basic crochet chain stitch! I just saw your pleated skirt dress design and I love your ideas!
That's cute! I never thought of doing something like that to jazz up my plain shirts!
that's really cute! love it.
I've never used liquid stitch before. Is it something you will be able to put in the washer or do you have to hand wash the shirt?
So curious!
http://portofthoughts.blogspot.com
http://creativelyconcocting.com
I love how yours turned out! The other braid/chain looks to me a lot like something I saw recently. Here is the link: http://www.vanessachristenson.com/2011/03/v-and-co-how-to-jersey-knit-bracelet.html
Looks to me like a slip-stitch via crochet. Either slip stitched directly onto the shirt or a crocheted that was then sewn on afterwards.
Great idea. Love the simplicity of this but yet upgrades a place shirt! Thanks for the inspiration.
Very very cute, definitely trying it out!!
get a big crochet hook a crochet book or someone to teach you and do a chain it looks just like the loop braid.
Looks great! I think I will have to try this using the technique someone posted above. Thanks for the idea 🙂
Yes, it looks like the kind of thing I used to do with the stretch loops to make bracelets….those you get with the weaving loom to make tiny potholders? Hope that helps…
So I know you just posted this, but did you get my comment before blogger crashed?
It looks like a crochet chain to me. I bet if you got a very large crochet hook (like size N or bigger) and just chained it loosely, it would end up looking just like that, then you could tack it down like you did the braid. If you're not sure how to crochet a chain, just google it- there are a MILLION tutorials. Hope this helps 🙂
It is a big crochet chain stich, You can do it with your fingers since it is that big.
Make a loop reach through and pull the tail through, repeat. I hope that made sense. I hope you know how to crochet or at least have a friend to show you,it is really easy and if I lived down the street I would be over in a second to show you.
I do live in Eagle Mountain, still not down the street.
I was going to say the same thing as Dena…
Paulette
when i saw this it reminded me of this post ( I had it marked cause I wanted to make one)
http://www.sewcraftcreate.com/2011/05/rope-bracelet-tutorial.html?utm_source=feedburner&utm_medium=feed&utm_campaign=Feed%3A+MadeByHeidi+%28Made+by+Heidi%29&utm_content=Google+Reader
not sure if it would work but now it makes me want to try. gonna have to dig thru my stash I think i have a shirt I could use
i think the top looks great! did you try to add another braid to it, to make it look more like the picture? i think it looks great as is, just wondering. xox
That is a cute shirt! I love your braided version too. I am with the other ladies in that it is a crochet chain. I have lots of jersey laying around. Thanks for the inspiration!
Your blog is fantastic. I'm your newest follower. I love all your knock off projects. you are very talented.
What a great idea! I just got a tee shirt and was wondering how to embellish it, and this is perfect!
By the way, that definitely is a crocheted edging, but I think I like yours better 🙂
There is another way to make that which involve making slits in the fabric like a ladder and then pulling one loop through the next. It's very easy to do, not so easy to explain.
We've awarded you the versatile blogger award. Check out our site to see what that means.
<3 Misty and Eve
bumblebliss.blogspot.com
Yesss, it is crochet, difficult to explain with pictures but it can be made with hands without the stick. Lovely idea.
Love this one! Fantastic and simple:) Thank you my dear!
thank you so much everyone! and also the people that commented before but got all deleted. and maegan, yes i did get your email, thank yoU! and Mrs. Grinder, all my pictures are the final results. i didn't think it'll look as good since the braid is a lot bigger and it's not a bunched up top. 🙂
xo
Yep, I'm with everyone else! Simple crochet chain–don't even need a hook! It's wickedly easy–good luck!
Not a fail, just a deviation – it is super cute!
I think it looks great!
http://www.simplycadence.blogspot.com
I am in love with this idea because it's a simple way to make a plain t shirt a little more interesting and dressy-ish.
I love this shirt, great job.
Girl, your shirt still looks REALLY good.
Yes, I am on the same boat with ironing, although I know how much it makes a different. And I am working on a reversible vest that requires tons of steaming and ironing – hah! It's gonna be the death of me – or another reason to get me a new iron LOL because "this one just doesn't work well" 😛
amazing, you are inspirational 🙂
that is such an awesome idea! I love the way it looks.
kathryn
http://www.thedragonsfairytail.blogspot.com
I don't think it's a fail, just different and equally pretty! What a great way to dress up a plain tshirt… thanks for sharing! xoxo
I just linked my page to this!
Simply adorable even if it didn't turn out the way you wanted it to.
Go check my version out 🙂
http://alltheabcsofmylife.blogspot.com/2011/05/ooops-oh-my.html
Comment 28 seems like how it's done, and I had recently seen a knit necklace done like this as well… ignore the actual knitting but consider the 2 strips and check it out here: http://olgajazzzy.blogspot.com/2010/12/cable-braided-necklace.html
this looks like it might help your braiding. 🙂
http://theautry.org/ortega/activity.php#braiding
The braiding is a Daisy Chain, like a sailor uses in tying knots so a rope becomes shorter. hope that helps!
And if you didn't want to cut the actual shirt, you could get similar fabric in a matching pattern and do the same thing. Even sew on snaps to the neckline and back of the 'braid' and have multiple looks for the same shirt.
To get the 2 strand braid look just use a giant sized crochet hook and chain stitch 1 strand. As it pulls through it makes it look like 2 strands.
It looks like two lines of chain stitches sort of braids, the kind in crochet. Search for a crochet chain stitch on youtube. Hope this is helpful!
Thanks for the inspiration. I am your fan! Please take a look at how turned out mine.
http://pinterest.com/pin/63543044712129018/
Many people had asked me where I bought it, it looks so chic.
Wasn't your Tshirt too short after cutting strips off the bottom?
@Jill, the shirt was really long to begin with so it was a perfect length after i cut it.
Thank you everyone!
Love it!!
I shared it, hope thats okey 🙂
http://crafterlifebyme.blogspot.com/2012/02/this-time-i-didnt-know-what-to-choose.html
of course! I saw the post and thank you!
Here is a "how to" on making that tulip trim…
http://www.threadsmagazine.com/item/22717/how-to-make-ribbon-trim?utm_source=email&utm_medium=eletter&utm_term=design&utm_content=20120207-ribbon-trim&utm_campaign=threads-eletter
Cool refashion. I linked up here:
http://sewprettysewfree.blogspot.com/2012/05/braided-top-diy.html
I don't think this was a fail at all! You didn't exactly duplicate the inspiration piece, but yours is just a cute! I'm going to watch for T-shirts to try something similar with. What a great refashion!!
THANK YOU!!!
YOu are so sweet, thank you so much!
nice!
http://tobchic.blogspot.com.es/
http://tobchic.blogspot.com.es/
cut tabs all the way around the neck like for fleece knot blankets. cut a sm. slit in the free edge of each tab and crochet one to the next.
Yes, I agree looks like chain stitch either crocheted or embroidered. Followed a link from pininterest on how to embellish a t-shirt and will use you as inspiration to actually do some wool embroidery around the neckline of a t-shirt dress I've made. Thanks!
I agree that the version that uses slits pulled through doesn't make as chunky a chain. BUT…I'm wondering if you could make slits in the shirt at the places where the loops should start and pull each loop of the chain up through the slit in the shirt AND the previous chain loop. If it works, that would allow you to avoid having to sew it on afterward.
I can't quite work out whether it would work, though, without trying it.