I made a simple knotted tee using this plain gray t-shirt I had.
 I cut the neckline of the shirt into a bigger roundneck and cut the shirt all the way down on the middle-left of the shirt. Then I knotted the top part of the two sides and sewed the knotted part from the inside. (I tucked the knotted part inside the shirt.) *note: when knotting, it’s more like twisting one side around and under the other side while the other side doesn’t really move except just bunching it up.)
and after…
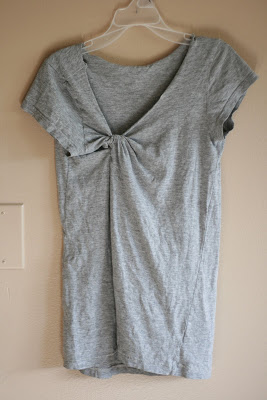
 I wouldn’t recommend using an already tight shirt to do this project since you cut the middle and sew it back up. My t-shirt was a size medium.

my project took me about 10 mins. and it cost me nothing!
that seems easy enough even for me to do! 😀
Great job! I've always wondered how to make a knot shirt.
This is so cute! Definitely looks like something you'd find at the store today!
So cute and cleverly done. Definitely on my to do list and soon. Love ALL your pics,lol!
So cute! Adds just a little detail and interest, love it!
I'm having a t-shirt linky party on Friday, hope you'll link this up!
http://www.mommagoround.blogspot.com
Wonderful! I'm addicted to t-shirt redos and this one's on my list now.
I have about 10 tee's that will get this treatment tomorrow…really nice idea!
Thanks for the "eye candy"….
Sandy
[email protected]
Cute shirt, and husband!
–Leigh
This is a technique I've never seen before and I love it!!
~Alison
http://oopsey-daisy.blogspot.com/
This is a truly great way to recycle (or upcycle as I like to call it.) I love it and would love to see you post this at my linky party Upcycled Awesome!
http://tinyurl.com/Upcycled9 and come back to my blog for Stashbusting-September. I promise it will be worth your while!
This is really cute! Creative idea, and it looks great on you!
Visiting from justsewsassy.com
Come by and check out my fun giveaway going on right now!
http://justsewsassy.com/2010/08/10/tuesday-tutorial-anthro-inspired-headband/
I love this! Will be doing this tonight. I love wearing t-shirts and this is a cute way to jazz them up.
Super idea, but I think you may have 'taken' it from if you saw my jammie top. Someone small & fuzzy nipped a spot on the neckline of my shirt & it RAN! To keep it from getting worse I tied a knot. Looked great though, I was finally fashionable. LOL
~C8>
lookin good Jay hahaha I miss you guys! Let's stop this phone tag nonsense now. love you!
Wow, what a great looking…..shirt! 🙂
I love a project like this! So simple, so cheap, and I could actually do it!!
Cute cute shirt!
Thanks for linking up at http://www.simplydesigning.blogspot.com
I love the shirt, and I love how you love your husband…sweet.
I love this shirt! : )
I featured you here:
http://firefliesandjellybeans.blogspot.com/2009/02/blog-post.html
Who knew a gray t-shirt could look so good?! Great job. How far down did you cut the shirt?
Thanks everyone!
Christianne: I cut it all the way down. hope that helps!
awesome idea! looks great, and so does the shirt! ;o)
Very Nice! I will try!
So cute! I'll have to try it.
Just so I'm clear–when you're done, you're left with a seam off-center running down the front of your shirt, right?
Nelka, I'm trying to work that out too.
So you resew a seam down the middle of the shirt?
@pinklizzy: sorry, i replied to nelka directly but forgot to write the answer here too. so yes you cut the shirt off center and then you sew it closed. hope that makes sense!
Just to clarify you cut the neck bigger then cut it across to like the armpit?
i cut off center, more to the right all the way down. so not to the armpit. hope that made sense!
I'm sorry but I still don't understand "cut it all the way down". You cut the shirt in half? If so, wouldn't you have to stitch it all the way back together. If not, did you cut it about halfway down to like your ribcage or underwire of your bra? Maybe you could do it to another t-shirt and post an in progress picture.
@emily, I did cut it all the way down as in to the very bottom of the shirt. So yes, I did sew it back together but not all the way to the top since there needs to be an opening for it to tie. Hope that helps.
Thanks! That totally helps. 🙂
I tried this one here:
http://orlosubito.blogspot.com/2011/08/antes-y-despues-camisetas-refashion.html
Is there a reason to cut it all the way down then sew it back together instead of just cutting it part way and knotting the top? I can't really see this seam in the picture, where is the seam?
Thanks for the help.
I was wondering the same thing about cutting it all the way down – Im lazy and dont want to sew it all back together if I dont have to!
http://onecraftyhooker.blogspot.com/
hi! I just came across this and just wanted to say its great! But did you stitch everything back by hand or using a sewing machine? When i stitch t-shirt materials it always comes out a little funny looking…
Hi Lindsey, I'm not sure if I replied directly to your email, but if not, sorry for such a late reply! You don't need to cut it all the way down, and the seam is slightly off the center.
Hi Jen, I'm not sure if I replied directly to your email, but if not, sorry for such a late reply! But like I commented above, you don't need to cut it all the way down, and the seam is slightly off the center.
I used the sewing machine. I had no problem with the t-shirt material, make sure the tension on your sewing machine isn't too tight. 🙂
What a great tutorial! I love reconstructing boring t-shirt into something fabulous like this. I like it so much, I ended up including it on my blog… http://darlingadventures.com/?p=574
Thanks!
Great Job!! Cute shirt.
I have had issues in the past with sewing knit on my machine too. I searched online for suggestions to help–the best solution I found is to put a piece of tissue paper under the bottom layer (before pinning,) pin, then sew. I had a piece of polka dot tissue paper left over from a gift bag (it was really wrinkled), so I tried it. After sewing, the tissue paper comes off easily and doesn't leave anything behind. The only other solution I found was to use a walking foot, which I don't have and didn't want to purchase.
Oh my, that is such a genius idea, thank you so much for sharing that useful information, thank you, thank you! Feel free to give me tips anytime! 😀
Thank you, I just left you a comment!
What a fantastic neckline for a necklace or earrings! http://v2crystals.com
i saw it, i loved it. instantly.
though, i can't sew for the life of me… :-/
just not clear – are you able to post more step-by-step photos for us non sewing people? thanks!
Hello!
This is a great idea. Perhaps it would be helpful if you don't have time to do a whole new tutorial to just post a picture of the shirt inside out where you sewed the knot together. That is what I have found tricky, I can't seem to figure out how to sew it without having the stitches show through on the right side.
Thank you 🙂
Não entendi! Seria masi claro se tivesse foto do corte
Também não entendi
So cute and easy. Some things that I've picked up for sewing with knits… trap your threads when you start your stitch. Start about an inch in if having issues with with machine eating fabric then go back when your done and stitch from the other way if needed…use a ball point needle. Once I figured all of these things out it's such a pleasure to sew with knits!
Good info. Lucky me I ran across your website by chance
(stumbleupon). I have book-marked it for later!
激安ブランド直営店
1.最も合理的な価格で商品を消費者に提供致します。
2.弊社の商品品数大目で、商品は安めです!商品現物写真。
3.数量制限無し、一個の注文も、OKです。
4.1個も1万個も問わず、誠心誠意対応します。
5.不良品の場合、弊社が無償で交換します。不明点、疑問点等があれば、ご遠慮なく言って下さい。
以上よろしくお願いいたします
休業日: 365天受付年中無休
You need a natural mix of do and no follow links, so don’t
be upset if you get some.
Your PR agency should have a system to measure and
evaluate PR coverage and be able to report back to you on progress.